it's october y'all. you know what that means.
SPOOKY SCARY SKELETONS 🕺🏻


Custom Cursor

Written by Danny
17.02.2026
Table of Contents
1 Intro

Often times, adding a custom cursor to your website really ties everything together. I used to love them on my websites and started making some for funsies and 🔗 uploaded some for you to use! So here's a quick little tutorial for you on how to add them. ✨
2 Have your Cursor ready!
Download a cursor or create one yourself (.png will do, but I think an .ico is usually used). Upload it and copy the URL.
3 HTML
All you have to do now is add the code to your body-tag.
cursor: url("YOUR_CURSOR_URL") 0 0, auto;4 Full Example
<!doctype html>
<html>
<head>
<title>Your own cursor!</title>
<meta charset="utf-8">

<style>
body {
	cursor: url("YOUR_CURSOR_URL") 0 0, auto;
}
</style>
</head>

<body>
</body>
</html>
5 Important Info
The numbers 0 0 tell the computer which exact part of your image does the "clicking".
0 pixels from the left
0 pixels from the top
In that case, you'd change the numbers to move the clicking point to the center of your image!
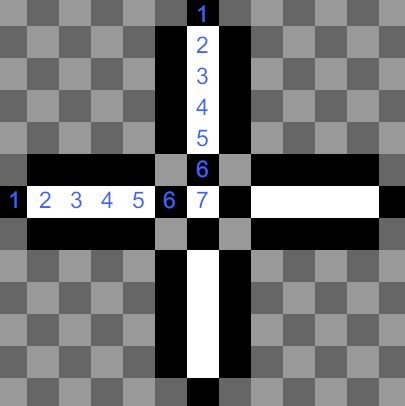
So for the crosshair cursor from the example, the middle would be 7 pixels from the left and 7 pixels from the top:
cursor: url("YOUR_CURSOR_URL") 7 7, auto;If you have any more questions, let us know! <3