it's october y'all. you know what that means.
SPOOKY SCARY SKELETONS 🕺🏻


JavaScript Intro
Written by nick
30.05.2025
Table of Contents
1 Intro
This tutorial covers the absolute basics of JavaScript by building a simple interactive page. You'll learn how to add JavaScript to a page, respond to user events, and update HTML content dynamically. Some basic knowledge of HTML and CSS is recommended before getting started!
2 The foundation: HTML and CSS
Let's start with a simple button and a message area. We'll use JavaScript to make them interactive, so when the button is clicked, we can change the content and appearance of the page.
Create a file named index.html and add the following code. We've given our elements unique IDs, such as id="myButton", which we'll use later to access them with JavaScript!
<!DOCTYPE html>
<html lang="en">
<head>
  <meta charset="UTF-8">
  <meta name="viewport" content="width=device-width, initial-scale=1.0">
  <title>JavaScript Basics</title>

  <style>
    body {
      font-family: sans-serif;
      text-align: center;
      padding-top: 50px;
      background: white;
      transition: 0.4s;
    }

    #output {
      margin-top: 20px;
      color: #333;
      font-weight: bold;
      border: 2px solid #333;
      padding: 10px;
      border-radius: 8px;
      background: white;
    }

    .main-button {
      padding: 10px 20px;
      font-size: 16px;
      cursor: pointer;
      border-radius: 5px;
      border: 1px solid #999;
      display: block;
      margin: 0 auto;
    }
  </style>
</head>

<body>

  <h1>JavaScript Basics</h1>

  <button id="myButton" class="main-button">Show message</button>

  <div id="output" style="display: none;"></div>

  <script>
    // We will add the logic here in the next steps!
  </script>

</body>
</html>
3 Ensuring the page is ready
Before we start interacting with our HTML, we need to make sure the page has been loaded far enough for JavaScript to find the elements we want to work with. JavaScript works with the DOM (Document Object Model), which is the browser's representation of the HTML on the page.
The position of your <script> can matter here. If JavaScript runs before an element has been added to the DOM, it won't be able to find that element yet. One common way to avoid this is to wait for the DOMContentLoaded event:
document.addEventListener("DOMContentLoaded", function() {
  // Our code goes here safely!
});
This tells the browser to wait until the HTML has been parsed before running our code. In our example, the <script> is already at the bottom of the page, so the elements exist by the time our script runs. We're still going to use DOMContentLoaded, though, because it's a useful habit to understand and it keeps our code safe if the script is moved somewhere else later.
4 Constants: Finding and storing elements
Once the page is ready, we need to "grab" our elements so we can interact with them. We use const to store each element in a variable. Think of this as giving a nickname to a specific part of your page.
For this guide, we'll name our variables myButton and myOutput. You can choose any variable names you like in your own projects, but keeping these names in mind will help you follow along as we use them in the next steps!
document.addEventListener("DOMContentLoaded", function() {

  // Connects to <button id="myButton"> in our HTML
  const myButton = document.getElementById("myButton");

  // Connects to <div id="output"> in our HTML
  const myOutput = document.getElementById("output");

});
5 Events: Listening for actions
Interactive websites work by waiting for events. Once we have saved references to our elements (like myButton), we use addEventListener to tell them to stay alert for specific user actions.
You place your event listeners directly inside your DOMContentLoaded function, right underneath where you created your constants:
document.addEventListener("DOMContentLoaded", function() {

  const myButton = document.getElementById("myButton");
  const myOutput = document.getElementById("output");

  // Place your event listeners here, right below your constants!
  myButton.addEventListener("click", function() {
    // Code to run when the button is clicked
  });

});
For our project, we will focus on the click event listener. Here are a few other simple, visual events you can easily swap into myButton to experiment with later:
mouseenter
Fires as soon as the mouse pointer hovers over an element.
myButton.addEventListener("mouseenter", function() { /* code here */ });dblclick
Fires when an element is rapidly double-clicked.
myButton.addEventListener("dblclick", function() { /* code here */ });There are actually hundreds of other events like key presses, scrolling, or touchscreen taps. We'll leave those for another time, though, no need to drown in documentation during your first hour!
If you're feeling curious later, you can find the full list on the Mozilla Developer Network (MDN).
6 Different ways to manipulate the page
Listening for a click is only half the magic. Once that click happens, we want something on the screen to actually change!
Think of JavaScript as a real-time editor for your web page. To make changes happen when someone clicks your button, you put your instructions inside the event listener function, right between the opening { and closing } curly brackets:
myButton.addEventListener("click", function() {

  // Your page changes go inside here!
  // This code runs every single time someone clicks the button.

});
For our toggle button, we only need three simple changes:
textContentto update what the text saysstyle.displayto show or hide the boxstyle.backgroundColorto change background colors
Here is what it looks like when we put those three instructions together inside our click listener:
myButton.addEventListener("click", function() {
  // 1. Update the message text
  myOutput.textContent = "You just clicked a button!";

  // 2. Make the hidden box visible on the page
  myOutput.style.display = "inline-block";

  // 3. Change the page background color
  document.body.style.backgroundColor = "rebeccapurple";

  // 4. Update the button text itself
  myButton.textContent = "Hide message";
});
Right now, these changes only work in one direction: once clicked, everything stays changed. Next, we will see how to make our button toggle things back and forth!
7 Decision making: If and Else
We know how to listen for a click and how to change page elements. But to make a toggle, JavaScript needs to make a decision based on the current state of the page. That's where if and else come in.
An if statement checks a condition. If the condition is true, the first block runs. If false, the else block runs.
We place this conditional logic directly inside our click event listener to swap between showing and hiding our elements:
myButton.addEventListener("click", function() {
  // Check if the message box is currently hidden
  if (myOutput.style.display === "none") {

    // Fill in our message text
    myOutput.textContent = "You just clicked a button!";

    // Make the message box visible
    myOutput.style.display = "inline-block";

    // Turn the page background rebecca purple
    document.body.style.backgroundColor = "rebeccapurple";

    // Change the button text so the user knows clicking again will hide it
    myButton.textContent = "Hide message";

  } else {
    // Hide the message box again
    myOutput.style.display = "none";

    // Reset the page background back to white
    document.body.style.backgroundColor = "white";

    // Reset the button text back to its original state
    myButton.textContent = "Show message";

  }
});
Notice the three equals signs (===). We use === to check if values match, while a single = sets a value.
Now we have all the pieces ready to assemble inside our complete HTML page!
8 Putting it all together
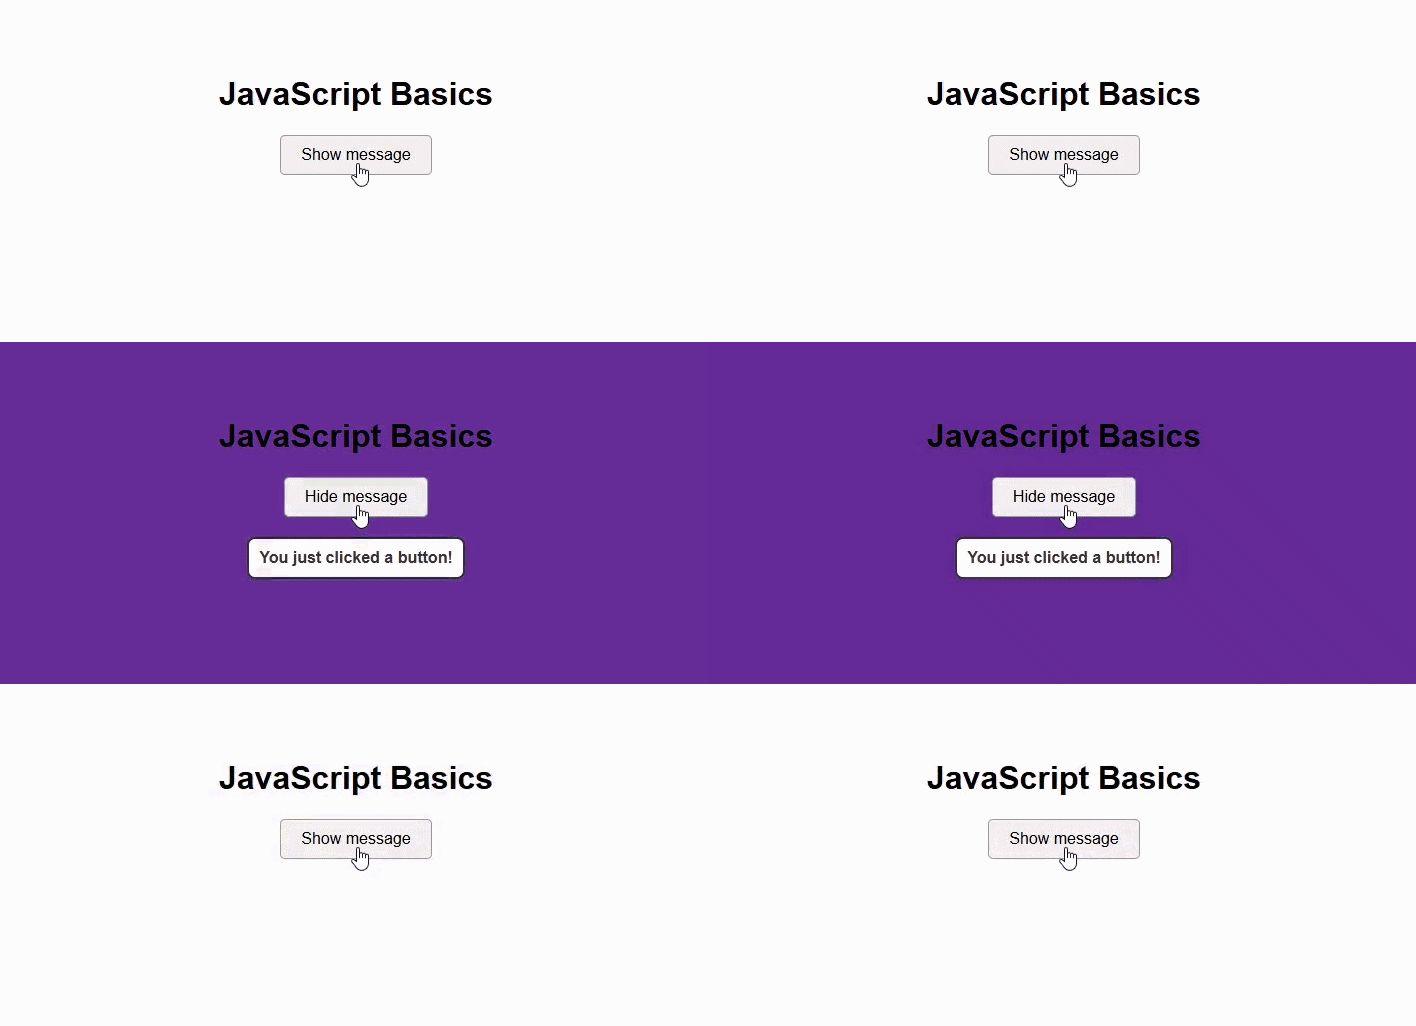
Now let's put everything we've learned together and make a small interactive page. We'll turn our button into a simple toggle: clicking it will show or hide the message box and change the page background.
<!DOCTYPE html>
<html lang="en">
<head>
  <meta charset="UTF-8">
  <meta name="viewport" content="width=device-width, initial-scale=1.0">
  <title>JavaScript Basics</title>

  <style>
    body {
      font-family: sans-serif;
      text-align: center;
      padding-top: 50px;
      background: white;
      transition: 0.4s;
    }

    #output {
      margin-top: 20px;
      color: #333;
      font-weight: bold;
      border: 2px solid #333;
      padding: 10px;
      border-radius: 8px;
      background: white;
    }

    .main-button {
      padding: 10px 20px;
      font-size: 16px;
      cursor: pointer;
      border-radius: 5px;
      border: 1px solid #999;
      display: block;
      margin: 0 auto;
    }
  </style>
</head>

<body>

  <h1>JavaScript Basics</h1>

  <button id="myButton" class="main-button">Show message</button>

  <div id="output" style="display: none;"></div>

  <script>
    document.addEventListener("DOMContentLoaded", function() {
      const myButton = document.getElementById("myButton");
      const myOutput = document.getElementById("output");

      myButton.addEventListener("click", function() {

        // Check if the message box is currently hidden
        if (myOutput.style.display === "none") {

          // Fill in our message text
          myOutput.textContent = "You just clicked a button!";

          // Make the message box visible
          myOutput.style.display = "inline-block";

          // Turn the page background rebecca purple
          document.body.style.backgroundColor = "rebeccapurple";

          // Change the button text so the user knows clicking again will hide it
          myButton.textContent = "Hide message";

        } else {

          // Hide the message box again
          myOutput.style.display = "none";

          // Reset the page background back to white
          document.body.style.backgroundColor = "white";

          // Reset the button text back to its original state
          myButton.textContent = "Show message";

        }

      });
    });
  </script>

</body>
</html>
And that's it! You just built a small interactive page with JavaScript. You learned how to wait for the DOM, find HTML elements, listen for events, make decisions with if/else, and change the page dynamically.
These are some of the basic building blocks you'll use again and again when you start making more interactive websites. Ready to see what else JavaScript can do? Check out the bonus step below for more ways to update web elements!
9 Bonus: More ways to manipulate your page
Congratulations on completing the core project! Once you feel comfortable with basic text and inline styles, here are a few other common ways developers change web page elements in everyday projects:
Adding HTML tags with innerHTML
Use textContent for plain text. If you want to insert actual HTML tags (like bold text or links), use innerHTML instead so the browser renders them properly:
myButton.addEventListener("click", function() {
  // Shows a success message with HTML formatting
  myOutput.innerHTML = "<strong>Success!</strong> You logged in.";
});
CSS Property Names in JavaScript
When changing styles in JavaScript, standard CSS properties with dashes are converted to camelCase (remove the dash and capitalize the next letter):
background-colorbecomesstyle.backgroundColorfont-sizebecomesstyle.fontSize
myButton.addEventListener("click", function() {
  // Set background color
  document.body.style.backgroundColor = "rebeccapurple";

  // Increase text size
  myOutput.style.fontSize = "20px";
});
Adding or removing CSS classes
Instead of changing styles line by line in JavaScript, you can define classes in your CSS file and add, remove, or toggle them on the fly:
myButton.addEventListener("click", function() {
  // Add a CSS class
  myOutput.classList.add("active");

  // Remove a CSS class
  myOutput.classList.remove("hidden");

  // Toggle a class on and off automatically
  myOutput.classList.toggle("highlight");
});
Changing HTML attributes
You can also update attributes like image sources or disable buttons directly:
myButton.addEventListener("click", function() {
  // Disable the button so it cannot be clicked again
  myButton.disabled = true;

  // Change an image source dynamically
  myImage.src = "new-photo.jpg";
});
I hope this tutorial will help you to create amazing things in the future! <3